Hi bloggers!
I know galaxy nails have been going around for a while now but I just got around to giving them a try. I liked a lot of the pictures I've seen posted online and watched a tutorial on how to do them a while ago and decided to give them a shot finally.
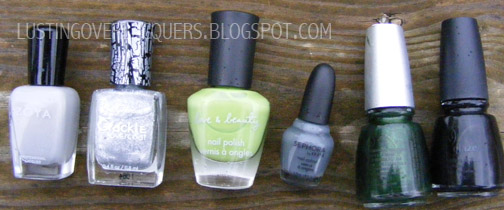
I started off with a black base coat, China Glaze Liquid Leather. Next, I decided some flakes would be a great idea to add some interest to the black so it wasn't just a flat black. I used Hidden Treasure from Sally Hansen, the most beautiful flakes ever.
I used a lot of different colors, probably more than I needed to but oh well. I had fun creating the nebula effect on my nails. I created this by using a wet Q-tip, similar to my glitter gradient post. The colors used in the order they were used from left to right: China Glaze Liquid Leather, Sally Hansen Hidden Treasure, Sephora by OPI Blue Grotto, Zoya Caitlin Love and Beauty Lime, China Glaze Touch of Glamour, Sephora by OPI Wardrobe Change, China Glaze White Cap, and for the stars I used China Glaze White On White.
If I were to do these again, I would definitely want to find a tool to make smaller stars because mine turned out way too big for my liking. Also, I would probably want to use a yellow for my stars instead of white, or maybe mix some yellow and white together to get a good color for the stars because I feel like the white looks a little out of place. You could also just go without the stars at all, I really liked just the nebula look by itself.
Hope you guys enjoyed!
-Lindsey