Hey guys!
Color blocking is all over the place right now, nail polish trends included! It's pretty simple to do as long as you have some tape and a little bit of time. To achieve my nice straight lines I just used regular scotch tape and made sure to wait long enough between each color to make sure they were dry before I applied the tape.
The colors I used from left to right are Read My Palm, Teal We Meet Again, and Rumba Romance all from Sephora by OPI's Havana Nights collection. I LOVE this whole collection, especially these three colors together.
Hope you guys enjoyed!
Lindsey
Showing posts with label Sephora by OPI. Show all posts
Sunday, July 15, 2012
Tuesday, June 19, 2012
Slanted French Tip
Hey guys!
I've got a multi-colored, slanted french tip for you today. As I've said before, I'm not a huge fan of french tips but this one is a bit of a twist. I used 3 different base coats, Blue Grotto from Sephora by OPI, Caliente Romance from Sephora by OPI, and Fuchsia from China Glaze. I used White Cap from China Glaze for the french tip.
A simple twist on a classic look, hope you enjoyed!
Lindsey
I've got a multi-colored, slanted french tip for you today. As I've said before, I'm not a huge fan of french tips but this one is a bit of a twist. I used 3 different base coats, Blue Grotto from Sephora by OPI, Caliente Romance from Sephora by OPI, and Fuchsia from China Glaze. I used White Cap from China Glaze for the french tip.
A simple twist on a classic look, hope you enjoyed!
Lindsey
Thursday, April 12, 2012
Tribal Inspired
Hey guys!
I've got a tribal inspired look that I love! Tribal and color blocking is everywhere right now so why not put it on my nails?
The colors I used from left to right, Delia's Bright Purple, Sephora by OPI Read My Palm, and Sephora by OPI Rumba Romance. I also used a Stripe Rite polish in black to make the lines on my ring fingers.
You guys know how much I love my accent nails! The first picture is in natural light and the bottom one is with a flash.
I really love all of the nail art I've been seeing lately but it's always on every single nail and for me and my personality, it can get a little much which is why I like my accent nails even more! Hope you guys enjoyed!
-Lindsey
I've got a tribal inspired look that I love! Tribal and color blocking is everywhere right now so why not put it on my nails?
The colors I used from left to right, Delia's Bright Purple, Sephora by OPI Read My Palm, and Sephora by OPI Rumba Romance. I also used a Stripe Rite polish in black to make the lines on my ring fingers.
You guys know how much I love my accent nails! The first picture is in natural light and the bottom one is with a flash.
I really love all of the nail art I've been seeing lately but it's always on every single nail and for me and my personality, it can get a little much which is why I like my accent nails even more! Hope you guys enjoyed!
-Lindsey
Sunday, April 8, 2012
Easter Nails
Happy Easter everyone!
If you don't celebrate Easter, then happy Sunday! Lots of colors and a franken are coming your way! The base colors I used from left to right are OPI Play in the Peonies, Zoya Catlin, OPI Time-less is More, China Glaze Light as Air, and Sally Hansen Diamond Strength Diamonds
I hope everyone enjoyed their weekend and are ready for the week ahead!
Lindsey
If you don't celebrate Easter, then happy Sunday! Lots of colors and a franken are coming your way! The base colors I used from left to right are OPI Play in the Peonies, Zoya Catlin, OPI Time-less is More, China Glaze Light as Air, and Sally Hansen Diamond Strength Diamonds
The colors are in reverse order on my nails and Diamonds was used as a top coat on top of them just to give a similar finish to all of them. I love adding Diamonds on top of colors just to add a little shimmer on top especially if the colors don't have any shimmer in them.
Next comes the polka dots! The colors I used for the polka dots from left to right are China Glaze White on White, Sephora by OPI Blue Grotto, my own glitter franken, and OPI Purple with a Purpose.
My glitter franken was just a bunch of little Bon-Bon polishes mixed together in an empty bottle. It didn't quite turn out how I had hoped it would but I still like how it turned out. Here are on some close ups of it in the bottle and on my nail.
I hope everyone enjoyed their weekend and are ready for the week ahead!
Lindsey
Monday, March 26, 2012
Sunshine Gradient
Hey guys!
We have had unseasonably warm weather here the past week or so and I, like Brielle am a child of the sun! Now however, it's back to regular spring time weather, not as warm but still pretty. I love summer and being outside at the pool or beach or lake or any other body of water when it's warm out. Unfortunately, I am no longer in school so that means no spring break trips :( but my nails say otherwise!
I've been wanting to try out color gradients instead of glitter gradients. I was waiting to try it till it got a little warmer out and could use brighter colors, not the I shy away from bright colors in the colder weather. But anyway, onto the nails!
The colors I used from left to right:Animal-istic from OPI, Coral Star from China Glaze, Cab Fare from Sephora by OPI, and White Cap from China Glaze.
I used Cab Fare as my base and then took Coral Star on a wet Q-tip and started the gradient process which you can read about here. I used a little bit of Animal-istic to darken up my tip, it worked perfectly.
To help the colors blend better, I used White Cap which is one of Brielle and I's favorites. It's a shear white with yellow shimmer so it worked really well with the orange and yellow.
We have had unseasonably warm weather here the past week or so and I, like Brielle am a child of the sun! Now however, it's back to regular spring time weather, not as warm but still pretty. I love summer and being outside at the pool or beach or lake or any other body of water when it's warm out. Unfortunately, I am no longer in school so that means no spring break trips :( but my nails say otherwise!
I've been wanting to try out color gradients instead of glitter gradients. I was waiting to try it till it got a little warmer out and could use brighter colors, not the I shy away from bright colors in the colder weather. But anyway, onto the nails!
The colors I used from left to right:Animal-istic from OPI, Coral Star from China Glaze, Cab Fare from Sephora by OPI, and White Cap from China Glaze.
I used Cab Fare as my base and then took Coral Star on a wet Q-tip and started the gradient process which you can read about here. I used a little bit of Animal-istic to darken up my tip, it worked perfectly.
To help the colors blend better, I used White Cap which is one of Brielle and I's favorites. It's a shear white with yellow shimmer so it worked really well with the orange and yellow.
I have a real problem with staring at my own nails whenever I have glitter or gradients on them, this was no exception. Hope you guys liked it!
Lindsey
Monday, November 28, 2011
Fall Water Marble
Hi bloggers!
As I'm sure you've notices, we've been a little MIA lately! We are so, so sorry about that. With Thanksgiving having just passed, we were both really busy in our personal life between work, school, the holiday, and family time so hopefully we'll get some good posts in before Christmas!
I took the next two posts of mine before the holiday, as well as before I let my nails go naked for about a week which resulted in six of them breaking. Six, yes six of them broke. I wasn't too happy about that but I got a new growth treatment to try out so now is the perfect time to! It's a 5 day treatment to you guys will be seeing the results sometime before Christmas so keep an eye out.
Anyway, on with the pictures! The colors I used from left to right: OPI Peach-A-Boo!, OPI Take the Stage, and Sephora by OPI What's Your Point-settia?.
I used Peach-A-Boo! as my base coat and it was a lot more shear that I had hoped it was going to be. I though once I had the second layer on from the water marble it would help some. It did but it was still a lot more shear than I had hoped for. I loved this color combination though regardless!
Hope you enjoyed!
Lindsey
As I'm sure you've notices, we've been a little MIA lately! We are so, so sorry about that. With Thanksgiving having just passed, we were both really busy in our personal life between work, school, the holiday, and family time so hopefully we'll get some good posts in before Christmas!
I took the next two posts of mine before the holiday, as well as before I let my nails go naked for about a week which resulted in six of them breaking. Six, yes six of them broke. I wasn't too happy about that but I got a new growth treatment to try out so now is the perfect time to! It's a 5 day treatment to you guys will be seeing the results sometime before Christmas so keep an eye out.
Anyway, on with the pictures! The colors I used from left to right: OPI Peach-A-Boo!, OPI Take the Stage, and Sephora by OPI What's Your Point-settia?.
I used Peach-A-Boo! as my base coat and it was a lot more shear that I had hoped it was going to be. I though once I had the second layer on from the water marble it would help some. It did but it was still a lot more shear than I had hoped for. I loved this color combination though regardless!
Hope you enjoyed!
Lindsey
Monday, October 31, 2011
Grave Stones
Hi bloggers!
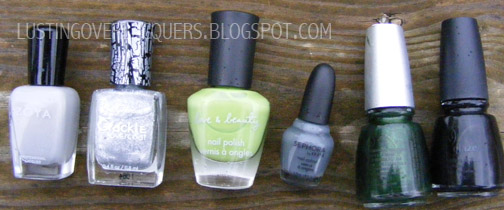
The Halloween nails continue with grave stone nails. I used a wet Q-tip to create this look similar to my glitter gradient and galaxy nail designs. I also used come crackle polishes as well. The base coat I used was Dove from Zoya and the crackle I used was Sally Hansen Fractured Foil Crackle Overcoat. The colors used to with the wet Q-tip where Avocado from Love & Beauty and Sephora by OPI A Leg-Warmer. The black detail is China Glaze Liquid Leather and the green grass is China Glaze Jolly Holly.
I hope you guys have liked our Halloween posts and given them a shot!
Lindsey
The Halloween nails continue with grave stone nails. I used a wet Q-tip to create this look similar to my glitter gradient and galaxy nail designs. I also used come crackle polishes as well. The base coat I used was Dove from Zoya and the crackle I used was Sally Hansen Fractured Foil Crackle Overcoat. The colors used to with the wet Q-tip where Avocado from Love & Beauty and Sephora by OPI A Leg-Warmer. The black detail is China Glaze Liquid Leather and the green grass is China Glaze Jolly Holly.
I hope you guys have liked our Halloween posts and given them a shot!
Lindsey
Wednesday, October 19, 2011
Breast Cancer Awareness Post: Pink Water Marble
Hi bloggers!
Here is my last Breast Cancer Awareness Post and it is a pink water marble! I tried a few different color combinations, as well as different color orders before I got something that actually worked well. The colors from left to right: China Glaze Fuschia, OPI Play the Peonies, and Sephora by OPI BYOBoy.
Be sure to do your part this month to support Breast Cancer Awareness. Donate money, participate in a charity walk/race, donate your time to the charity walk/races, do something and get involved to help cure breast cancer! Besides painting my nails to show my support, I donated money to support the cure! Keep in mind that you can support the cure year around, not only during certain months so get out there and help support the fight for any and all cancers because we all know of someone who has or had some form of cancer or another.
Hope you guys enjoyed!
-Lindsey
Here is my last Breast Cancer Awareness Post and it is a pink water marble! I tried a few different color combinations, as well as different color orders before I got something that actually worked well. The colors from left to right: China Glaze Fuschia, OPI Play the Peonies, and Sephora by OPI BYOBoy.
Be sure to do your part this month to support Breast Cancer Awareness. Donate money, participate in a charity walk/race, donate your time to the charity walk/races, do something and get involved to help cure breast cancer! Besides painting my nails to show my support, I donated money to support the cure! Keep in mind that you can support the cure year around, not only during certain months so get out there and help support the fight for any and all cancers because we all know of someone who has or had some form of cancer or another.
Hope you guys enjoyed!
-Lindsey
Monday, October 10, 2011
Breast Cancer Awareness Post: Hot Pink Ribbons
Hi bloggers!
Here is my third breast cancer awareness post, this one featuring the pink cancer ribbon! My other posts are more inspired simply by using the color pink, but this one really screams what it's all about! The two colors I used were China Glaze Fucshia and Sephora by OPI Dear Diary. Fuchsia is a great hot pink, especially for the summer and Dear Diary is a great sheer light pink.
Sorry the second picture is a bit blurry, my cat bumped my arm EVERY picture I tried to take because she wanted some attention.
One more breast cancer awareness post then on to some Halloween ones, hope you enjoyed!
-Lindsey
Here is my third breast cancer awareness post, this one featuring the pink cancer ribbon! My other posts are more inspired simply by using the color pink, but this one really screams what it's all about! The two colors I used were China Glaze Fucshia and Sephora by OPI Dear Diary. Fuchsia is a great hot pink, especially for the summer and Dear Diary is a great sheer light pink.
Sorry the second picture is a bit blurry, my cat bumped my arm EVERY picture I tried to take because she wanted some attention.
One more breast cancer awareness post then on to some Halloween ones, hope you enjoyed!
-Lindsey
Sunday, October 2, 2011
Breast Cancer Awareness Post: Light Pink Diamonds
Hi bloggers!
As I'm sure we all know, October is Breast Cancer Awareness Month so in honor of that, I decided to do a few pink posts dedicated to Breast Cancer Awareness. The first look is a light pink, layered shear with glitter on top. The colors used from left to right: Sephora by OPI Wardrobe Change, Translucent by Studio M, and Covered in Diamonds by Studio M. The two first colors are very shear but I still only did a coat of each color and then the Diamonds as a top coat.
I really like the Diamonds because it isn't an actual glitter or flakes, it's larger particles that sometimes stick up from your nails which can be a little annoying and get caught on things but it's so pretty I don't really mind.
Hope you enjoyed and be on the look out for a few more pink posts and then some Halloween posts!
-Lindsey
Tuesday, September 20, 2011
Galaxy Nails
Hi bloggers!
I know galaxy nails have been going around for a while now but I just got around to giving them a try. I liked a lot of the pictures I've seen posted online and watched a tutorial on how to do them a while ago and decided to give them a shot finally.
I started off with a black base coat, China Glaze Liquid Leather. Next, I decided some flakes would be a great idea to add some interest to the black so it wasn't just a flat black. I used Hidden Treasure from Sally Hansen, the most beautiful flakes ever.
I used a lot of different colors, probably more than I needed to but oh well. I had fun creating the nebula effect on my nails. I created this by using a wet Q-tip, similar to my glitter gradient post. The colors used in the order they were used from left to right: China Glaze Liquid Leather, Sally Hansen Hidden Treasure, Sephora by OPI Blue Grotto, Zoya Caitlin Love and Beauty Lime, China Glaze Touch of Glamour, Sephora by OPI Wardrobe Change, China Glaze White Cap, and for the stars I used China Glaze White On White.
If I were to do these again, I would definitely want to find a tool to make smaller stars because mine turned out way too big for my liking. Also, I would probably want to use a yellow for my stars instead of white, or maybe mix some yellow and white together to get a good color for the stars because I feel like the white looks a little out of place. You could also just go without the stars at all, I really liked just the nebula look by itself.
Hope you guys enjoyed!
-Lindsey
I know galaxy nails have been going around for a while now but I just got around to giving them a try. I liked a lot of the pictures I've seen posted online and watched a tutorial on how to do them a while ago and decided to give them a shot finally.
I started off with a black base coat, China Glaze Liquid Leather. Next, I decided some flakes would be a great idea to add some interest to the black so it wasn't just a flat black. I used Hidden Treasure from Sally Hansen, the most beautiful flakes ever.
I used a lot of different colors, probably more than I needed to but oh well. I had fun creating the nebula effect on my nails. I created this by using a wet Q-tip, similar to my glitter gradient post. The colors used in the order they were used from left to right: China Glaze Liquid Leather, Sally Hansen Hidden Treasure, Sephora by OPI Blue Grotto, Zoya Caitlin Love and Beauty Lime, China Glaze Touch of Glamour, Sephora by OPI Wardrobe Change, China Glaze White Cap, and for the stars I used China Glaze White On White.
If I were to do these again, I would definitely want to find a tool to make smaller stars because mine turned out way too big for my liking. Also, I would probably want to use a yellow for my stars instead of white, or maybe mix some yellow and white together to get a good color for the stars because I feel like the white looks a little out of place. You could also just go without the stars at all, I really liked just the nebula look by itself.
Hope you guys enjoyed!
-Lindsey
Tuesday, September 6, 2011
Transitioning Into Fall
Hi bloggers!
If you live in the mid west of the US like Brielle and I do, then you know the seasons are beginning to change weather or not we want them to! So what does this mean for you nails? Of course you can keep them whatever colors you want but I do tend to generally follow the seasons when it comes to my color choices. Around this time of year I start using more reds and darker pinks to ease into fall. This NOFD is Sephora by OPI BYOBoy. I love this color, it's the perfect dark mauvey-pink.
I'm also going to start including some dupes with some of my posts. As my nail polish collection has grown and continues to grow, I've noticed I've gotten more and more dupes without really noticing that I had acquired so many. Some of the colors are from different seasonal collections and some or more permanent colors from different nail polish brands. This group of dupes are obviously reds, another good fall transition color. The colors from left to right: Revlon Valentine, China Glaze Phat Santa, China Glaze Drastic, and Sally Hansen Hollywood Scarlet.
If you live in the mid west of the US like Brielle and I do, then you know the seasons are beginning to change weather or not we want them to! So what does this mean for you nails? Of course you can keep them whatever colors you want but I do tend to generally follow the seasons when it comes to my color choices. Around this time of year I start using more reds and darker pinks to ease into fall. This NOFD is Sephora by OPI BYOBoy. I love this color, it's the perfect dark mauvey-pink.
I'm also going to start including some dupes with some of my posts. As my nail polish collection has grown and continues to grow, I've noticed I've gotten more and more dupes without really noticing that I had acquired so many. Some of the colors are from different seasonal collections and some or more permanent colors from different nail polish brands. This group of dupes are obviously reds, another good fall transition color. The colors from left to right: Revlon Valentine, China Glaze Phat Santa, China Glaze Drastic, and Sally Hansen Hollywood Scarlet.
On each finger there are two coats of the color. As you can tell, they are all pretty similar shades.
Hope you enjoyed!
-Lindsey
-Lindsey
Wednesday, August 24, 2011
How To: Glitter Gradients are Spark-tacular!
Hi lacquer lovers!
Today's post is going to be all about creating a glitter gradient. I know I've seen multiple tutorials on how to create them, so if you've seen them as well, sorry, here's another one but for the ones of you who haven't take a good look!
Things you will need:
After your base coat is completely dry, on to the glitter! Take your Q-tip and get the tip of it wet but not dripping wet. If the Q-tip is wet then the glitter won't stick to it as much and will transfer for your nail nicely.
Once your Q-tip is wet, open your bottle of glitter and put some polish on to the tip then start to apply to your nail. I start at the very tip of my nail and pat downward toward the cuticle and keep repeating this process until you get the effect that you like. I used Sephora by OPI's Spark-takular!
The last step, as always is a good clear top coat! And a great way to remove this mani once you're ready to switch it up, would be to use the foil method which I posted about not too long ago :)
I hope this was helpful to those of you who were wanting to learn!
-Lindsey
PS- this is my birthday manicure!! :)
Today's post is going to be all about creating a glitter gradient. I know I've seen multiple tutorials on how to create them, so if you've seen them as well, sorry, here's another one but for the ones of you who haven't take a good look!
Things you will need:
- Q-tips or cosmetic sponge (I use Q-tips, I think they're easier and cheaper)
- Glitter nail polish (kind of obvious lol) and a regular polish if you want a base coat color
- water
- patience
After your base coat is completely dry, on to the glitter! Take your Q-tip and get the tip of it wet but not dripping wet. If the Q-tip is wet then the glitter won't stick to it as much and will transfer for your nail nicely.
Once your Q-tip is wet, open your bottle of glitter and put some polish on to the tip then start to apply to your nail. I start at the very tip of my nail and pat downward toward the cuticle and keep repeating this process until you get the effect that you like. I used Sephora by OPI's Spark-takular!
The last step, as always is a good clear top coat! And a great way to remove this mani once you're ready to switch it up, would be to use the foil method which I posted about not too long ago :)
I hope this was helpful to those of you who were wanting to learn!
-Lindsey
PS- this is my birthday manicure!! :)
Thursday, July 14, 2011
Glittergasm
Hi bloggers!
Incase you couldn't guess from the title, there is a complete and total glittlergasm on my nails and I LOVE IT! I started off with a black base, China Glaze Liquid Leather, to make the glitter really stand out.
Next, I wanted to try out a polish I hadn't gotten to try yet, Wet N Wild Party of Five Glitters. I was a little disappointed with this because there just wasn't enough glitter for my liking. For this to be how I wanted, I would have to put on a TON of layers.
And for the glittergasm, Sephora by OPI Spark-tacular!
I absolutely LOVE, LOVE, LOVE this polish....and not only is it amazing but it also is a pretty close dupe for Deborah Lippmann's Happy Birthday which I've been wanting for a while now. If you love glitter polish, this is a must buy.
Hope you enjoyed as much as I did!
-Lindsey
Tuesday, July 12, 2011
Sephora by OPI Looks Like Rain, Dear
Hey everyone! (Does anyone else feel weird saying Hello, everyone? haha, I do.)
Some of my favorite summer nail polishes are technically from winter collections! Ha! Out fooled you, Mother Nature!
Anyone will tell you that I love my nudes and glitters. Well, since we've went through all the nudes I had for my Bridal Series, on to glitters!
This is Sephora by OPI's Looks Like Rain, Dear. It's a glorious golden glitter. I love love love wearing this color in the summertime, it just looks so wonderful in the sunlight!
See for yourselves:
See how the light reflects off the glitter?
Some of my favorite summer nail polishes are technically from winter collections! Ha! Out fooled you, Mother Nature!
Anyone will tell you that I love my nudes and glitters. Well, since we've went through all the nudes I had for my Bridal Series, on to glitters!
This is Sephora by OPI's Looks Like Rain, Dear. It's a glorious golden glitter. I love love love wearing this color in the summertime, it just looks so wonderful in the sunlight!
See for yourselves:
See how the light reflects off the glitter?
SO GORGEOUS! It just looks so pretty (even more if you had a tan, which I obviously do not.)
(By the way, this polish is TERRIBLE to take off. I use felt instead of a cotton ball and it works sooo much better, especially since I HATE the sound of stretching cotton.)
See you next time!
Brielle
Subscribe to:
Posts (Atom)