Showing posts with label OPI. Show all posts

Monday, July 23, 2012

Plastic Wrap Mani

Hey guys!

I tried out the plastic wrap technique and it wasn't a total success. If you haven't seen any manicures done like this, the process is pretty simple. All you need is two or more different nail polish and plastic wrap (yes, that stuff you use to wrap your leftover food up in). First paint your nails like normal and let them dry completely. Make sure you have little pieces of plastic wrap ready to use, roughly 2 inches by 2 inches. After your nails are dried, paint only one nail at a time and before it dries, crinkle your piece of plastic wrap and light dab off the still wet polish, wait for that to dry and apply our top coat! It's a pretty simple process. Where I messed up was my color selection, as you'll see. The colors I used were OPI Purple with Purpose and Zoya Reece.
It didn't turn out badly, it just didn't turn out as well as I hoped. If Reece was more opaque it would have been better I think. I thought about doing another color on top but in the end I didn't. It's definitely a technique I will do again! Hope you guys enjoyed!
Lindsey
Friday, June 15, 2012

Barbie Pink!

Hey guys!

This past weekend, my boyfriend and I had a wedding to go to so of course once I decided on what dress I was wearing, I had to figure out what to do with my nails! I waned something girly and pretty and simple. As I was looking through my polish I found Play the Peonies from OPI but I wanted more that just that beautiful light pearly pink so I went looking in my glitters to see if I could find anything that would go well. I found a glittery pink top coat from Forever21.

It turned out perfect! It changed Play the Peonies just enough (click here to see Play the Peonies by itself). As you can see, the top coat really did change the color and the glitter was just enough. I really liked how it turned out, hope you guys did too!
Lindsey

Saturday, June 9, 2012

Reverse Glitter Gradient

Hey guys!

I needed a little excitement on my nails so I decided to do a reverse glitter gradient. When in doubt, use some glitter! I wanted something brighter so the colors I used were Delia's Bright Purple and OPI Sparkle-licious.


I used the same method as my previous glitter gradients just focused the glitter at the bottom of my nail instead of the tip.

Hope you guys enjoyed!
Lindsey

Tuesday, April 10, 2012

Off With Her Red!

Hey guys,

Just a quick NOTD look featuring Off With Her Red! from OPI.

I could probably wear red on my nails almost everyday of my life. I love love love red nails! I know some people think red it too bold and loud for them but I love all reds from bright fire truck red to deep burgundy and everything in between.

Hope you enjoyed!
Lindsey

Sunday, April 8, 2012

Easter Nails

Happy Easter everyone!
If you don't celebrate Easter, then happy Sunday! Lots of colors and a franken are coming your way! The base colors I used from left to right are OPI Play in the Peonies, Zoya Catlin, OPI Time-less is More, China Glaze Light as Air, and Sally Hansen  Diamond Strength Diamonds
The colors are in reverse order on my nails and Diamonds was used as a top coat on top of them just to give a similar finish to all of them. I love adding Diamonds on top of colors just to add a little shimmer on top especially if the colors don't have any shimmer in them.
Next comes the polka dots! The colors I used for the polka dots from left to right are China Glaze White on White, Sephora by OPI Blue Grotto, my own glitter franken, and OPI Purple with a Purpose.
My glitter franken was just a bunch of little Bon-Bon polishes mixed together in an empty bottle. It didn't quite turn out how I had hoped it would but I still like how it turned out. Here are on some close ups of it in the bottle and on my nail. 

I hope everyone enjoyed their weekend and are ready for the week ahead!
Lindsey


Monday, March 26, 2012

Sunshine Gradient

Hey guys!

We have had unseasonably warm weather here the past week or so and I, like Brielle am a child of the sun! Now however, it's back to regular spring time weather, not as warm but still pretty. I love summer and being outside at the pool or beach or lake or any other body of water when it's warm out. Unfortunately, I am no longer in school so that means no spring break trips :( but my nails say otherwise!

I've been wanting to try out color gradients instead of glitter gradients. I was waiting to try it till it got a little warmer out and could use brighter colors, not the I shy away from bright colors in the colder weather. But anyway, onto the nails!

The colors I used from left to right:Animal-istic from OPI, Coral Star from China Glaze, Cab Fare from Sephora by OPI, and White Cap from China Glaze.
 I used Cab Fare as my base and then took Coral Star on a wet Q-tip and started the gradient process which you can read about here. I used a little bit of Animal-istic to darken up my tip, it worked perfectly.
 To help the colors blend better, I used White Cap which is one of Brielle and I's favorites. It's a shear white with yellow shimmer so it worked really well with the orange and yellow.

 I have a real problem with staring at my own nails whenever I have glitter or gradients on them, this was no exception. Hope you guys liked it!
Lindsey

Friday, February 10, 2012

Warm & Fozzie

Hey bloggers!

Another quick NOTD look, this one is Warm & Fozzie from the OPI Muppets collection. Beautiful shimmery bronze/brown for the character Fozzie Bear who is Kermit's best friend in the Muppets. When I first saw pictures of this one, I didn't think I would like it but once I saw it in person, I totally loved it without a doubt! It's a great darker neutral that has a good amount of shimmer. 


Hope you enjoyed!
Lindsey

Thursday, January 19, 2012

Melon of Troy with a little Peach-A-Boo

Hey guys!

Long time, no post! I'm so sorry but the holidays came and went, I went on vacation, my boyfriend moved states and it now here with me (yay! :D), and getting back on track with work it's been a little busy but here is a NOTD look I did in in the middle of all of it.

Melon of Troy from OPI, which I love. I got it as a present over the holidays.
And Peach-A-Boo from OPI on top, pretty sheer glittery peach that works wonderful on top of Melon of Troy. I loved this combo!

Oh! I wanted to tell you guys about my New Year's Resolution....which so far, so good. I decided that I am going to try not buy any nail polishes this year. I have so many polishes that I have only used once or some not at all so I want to start using more of my polishes and start making some frankens :) as well as save a little money! I know once the Hunger Games polishes come out on March, I will temporarily break my resolution but I will try to get back on track! Anyone else want to share their resolution with us?
-Lindsey

Sunday, December 4, 2011

It's beginning to look a lot like Christmas...

YOU GUYS!

While I am terrible at keeping up on this thing, I LOVE CHRISTMAS! Okay, actually, I love the holidays. Anywhere from the beginning of football season (counts as a holiday in our books) to New Years we are happy campers! There are loads of things to do, and loads of things to buy!

Honestly, I didn't have my nails painted for almost THREE WEEKS! I do not know what is up, but I just wasn't making time for a manicure! It's hard, because first I was doing football, and during the season it is so hard to get the motivation to paint my nails because I know they'll be chipped well within 24 hours! Now, I am in a teaching practicum. Did I mention I'm in school to become a teacher? I can't remember if I told you or not! But, I am! So I spend 10-11 hours a week in a middle school and it's hard for me to determine what polishes would be school appropriate or which ones would be a little flamboyant. Does anyone else have this problem - either in the classroom or at a conservative work place? Please let me know!

For my holiday themed nails (BECAUSE I LOVE CHRISTMAS!), I painted them a white base OPI Mummy knows best, with China Glaze's Party Harty layered on top!


It makes me giddy to think that Christmas is so close!  My nails are just an expression of my feelings :)


I hope everyone is having a spectacular holiday season, whether you celebrate Christmas, Hanukkah, or Kwanza! Enjoy this time with family and friends!


Love love love!
Brielle

Monday, November 28, 2011

Fall Water Marble

Hi bloggers!

As I'm sure you've notices, we've been a little MIA lately! We are so, so sorry about that. With Thanksgiving having just passed, we were both really busy in our personal life between work, school, the holiday, and family time so hopefully we'll get some good posts in before Christmas!

I took the next two posts of mine before the holiday, as well as before I let my nails go naked for about a week which resulted in six of them breaking. Six, yes six of them broke. I wasn't too happy about that but I got a new growth treatment to try out so now is the perfect time to! It's a 5 day treatment to you guys will be seeing the results sometime before Christmas so keep an eye out.

Anyway, on with the pictures! The colors I used from left to right: OPI Peach-A-Boo!, OPI Take the Stage, and Sephora by OPI What's Your Point-settia?.

I used Peach-A-Boo! as my base coat and it was a lot more shear that I had hoped it was going to be. I though once I had the second layer on from the water marble it would help some. It did but it was still a lot more shear than I had hoped for. I loved this color combination though regardless!

Hope you enjoyed!
Lindsey

Thursday, October 27, 2011

Glowing Pumpkins!

Hey bloggers!

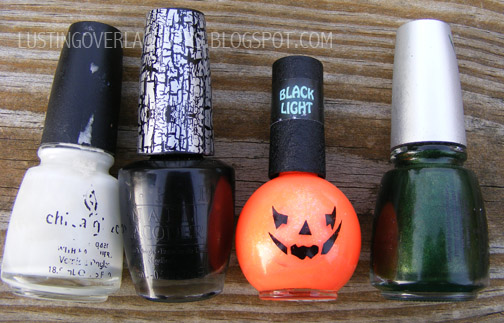
Cute pumpkins that glow under black light would be a great look for a party or clubbing night. The colors used for the pumpkin included the black light orange from the drug store, China Glaze Jolly Holly that is the green stem, and China Glaze Liquid Leather for the details, and for the crackle I used OPI Black Shatter.

My boyfriend and I named the pumpkin Hugo. 
I don't have a black light to see if the orange really does glow but from the consistency of it, I wouldn't be surprised if it did. Also, as you can tell my shatter, didn't shatter very well. I got this when OPI first came out with the black shatter so it is getting a little old. Has anyone else noticed theirs getting worse as it gets older? I'm kind of mad about it because only one of my nails really shattered instead of just streaking.

I've got at least one more look coming, possibly two so be on the look out!
Lindsey

Wednesday, October 19, 2011

Breast Cancer Awareness Post: Pink Water Marble

Hi bloggers!

Here is my last Breast Cancer Awareness Post and it is a pink water marble! I tried a few different color combinations, as well as different color orders before I got something that actually worked well. The colors from left to right: China Glaze Fuschia, OPI Play the Peonies, and Sephora by OPI BYOBoy. 


Be sure to do your part this month to support Breast Cancer Awareness. Donate money, participate in a charity walk/race, donate your time to the charity walk/races, do something and get involved to help cure breast cancer! Besides painting my nails to show my support, I donated money to support the cure! Keep in mind that you can support the cure year around, not only during certain months so get out there and help support the fight for any and all cancers because we all know of someone who has or had some form of cancer or another.

Hope you guys enjoyed!
-Lindsey

Friday, October 14, 2011

OPI Mummy Knows Best

Hi guys! Gosh, I know I am always apologizing about not posting, my life has been crazy! I honestly have not had my nails painted in at least a week. How awful. 

Football season is still raging on. We are now on week 6 of 10! Things have been going good. I am just so busy with my school, teaching in a middle school, and of course football. It's been crazy! 

OPI is so great. This is Mummy Knows Best. A pure white from the Halloween Mini's from this year. I  absolutely love having white nails. It's honestly my new favorite. I just love having clean looking nails! It makes me think of a blank slate, or a clean start. It's just so nice!

By the way, this was totally taken at practice. Can you see one of the boys running in the background. hahaha so funny.


Application was perfect, no chalkiness or goopiness. Mummy Knows Best is a dream and it's definitely my #1 white nail polish. The only little thing is, the edges (sides of my nails) never come out smooth and with white you can really tell - yikes!


I hope everyone is enjoying the change of weather and the cooler temperatures. I know I am! We're going to pick out some pumpkins this weekend!


I will do better at this, I promise.
Brielle

Monday, September 19, 2011

OPI Spookette's - He's My Boo

Hey everyone! OMG HALLOWEEN IS SO CLOSE!

Okay, Halloween is legit my favorite Holiday. No joke. I LOVE IT! Pumpkins, Candy, Dressing up, CANDY! Ahh!

So of course, I ALWAYS buy the halloween collections from the polish companies... It's my vice.

So, here's what I got:


To be honest, I usually HATE mini's. You'll see Lindsey with them, but not me. I just hate how little they are, how little the hole is, how the brush isn't a pro-wide which I ADORE, etc. But these are the BEST mini's I've EVER bought! Not kidding. They applied so well, no gloops or glopes.

These were also my gameday nails. The football team I work for color's are orange and black (how perfect, right?) and so I usually do a gameday mani (watch out for more of these :))

Okay, you know me, I can never not have tipwear, and not kidding, I took these on the field at our game, so sorry for the poor quality. But I mean do you see that foot? Yep, that's a cleat. The boy standing next to me was like uhh... are you taking pictures of your nails, and I just said yep! Hahaha I totally forgot to take them before the game and I knew that if I waited they would be goners.

Okay, I used two coats of He's my boo and one coat of CND's Gold shimmer. SO PRETTY. (Of course I topped it off with Seche Vite because I have NO patience for any other top coat). The shimmer looked so so so so pretty with the orange. Such a pretty combination.


We ended up losing, but it's okay, I love the boys anyways!

I hope everyone has a good week!

Brielle


Wednesday, September 7, 2011

OPI Brisbane Bronze

OH MY GOSH GUYS!

Seriously, my life has been ridiculous lately. Football has definitely taken over! I rarely have my nails painted because they always chip like 2.5 seconds later.

We've had our first game, so things are getting back to a normal routine, finally. Hopefully I'll do a weekly blog with my game day polish! Last year I did Oranges and designs, it was fun! I'll try and keep up on it!

This was after our first game:


On to the nails! Along with the post Lindsey did, I am transitioning into Fall. I LOVE FALL! Omg. It's my absolute favorite time of year, I love football, the cooler weather, EVERYTHING! While I wear whatever colors I want all year round, I usually find myself leaning toward the darker colors during fall. I almost always find myself with Oranges or browns or deep purples on my nails.

I figured for the first days of fall (after Labor Day!) I would try a bronze color that would work nicely in the summer with a tan and in the fall because it matched the leaves and footballs!

This is OPI's Brisbane Bronze a perfect color for the beginning of fall! UH! It just shimmers and looks so great on. Everyone always comments on how nice my nails look (while not being too ostentatious!). Of course the application was a dream, I love OPI. 


I hope everyone is enjoying the beginning days of fall! I know I am! Enjoy some college football and hot cocoa! 

Love love love!
Brielle & Adam

Saturday, September 3, 2011

It's My Year

Hi bloggers!

Just a simple NOTD post. This lovely color is It's My Year from OPI from the Miss Universe Collection. A picture in the sun and in the shade which I typically don't post but it's hard to get a picture of the true color because of the shimmer, it's just beautiful!
 I also wanted to talk about a buffer I recently purchased from Sephora. Like most make up enthusiasts, I love Sephora and all of the brands they have but every once and a while there are products that aren't so great, this buffer is one of them.

The honeycomb side is the buffing side and the opposite side is the polishing side. I barely began to buff my nails and saw rather large pieces of my nail being taken off so I immediately stop buffing. If you are a usual nail buffer like, Brielle and I, you would have done the same thing! If you weren't paying attention and weren't careful as to how much you buffed your nails, you could easily over-buff them to the point where they would be very thin, uncomfortably thin and cause breaking. I would not recommend anyone buying this buffer. This definitely isn't changing my views on Sephora, I still love Sephora, they just missed the mark on this product in my opinion. 

Hope you enjoyed! 
-Lindsey

Wednesday, August 24, 2011

How To: Glitter Gradients are Spark-tacular!

Hi lacquer lovers!

Today's post is going to be all about creating a glitter gradient. I know I've seen multiple tutorials on how to create them, so if you've seen them as well, sorry, here's another one but for the ones of you who haven't take a good look!

Things you will need:
  • Q-tips or cosmetic sponge (I use Q-tips, I think they're easier and cheaper)
  • Glitter nail polish (kind of obvious lol) and a regular polish if you want a base coat color
  • water
  • patience
 First step is to start with your base coat color. You don't have to do a base color if you don't want to but I find the glitter stands out more if you do, especially depending on the combination of base color and glitter color you use. The color I used was Time-less is More from OPI which is a shear white color that would be great for doing french manicures.

After your base coat is completely dry, on to the glitter! Take your Q-tip and get the tip of it wet but not dripping wet. If the Q-tip is wet then the glitter won't stick to it as much and will transfer for your nail nicely.

Once your Q-tip is wet, open your bottle of glitter and put some polish on to the tip then start to apply to your nail. I start at the very tip of my nail and pat downward toward the cuticle and keep repeating this process until you get the effect that you like. I used Sephora by OPI's Spark-takular! 

The last step, as always is a good clear top coat! And a great way to remove this mani once you're ready to switch it up, would be to use the foil method which I posted about not too long ago :)

I hope this was helpful to those of you who were wanting to learn!
-Lindsey

PS- this is my birthday manicure!! :)